Thursday, February 12, 2015
Nexus 9000 Standalone mode eNXOS - New Feature Walkthrough
Thursday, April 24, 2014
Cisco vNAM and ERSPAN config on N7K
erspan-id 90
vrf default
destination ip 10.1.90.71
source vlan 90-91,93 both
no shut
session 10
---------------
type : erspan-source
state : up
erspan-id : 90
vrf-name : default
acl-name : acl-name not specified
ip-ttl : 255
ip-dscp : 0
destination-ip : 10.1.90.71
origin-ip : 10.1.90.254 (global)
source intf :
rx :
tx :
both :
source VLANs :
rx : 90-91,93
tx : 90-91,93
both : 90-91,93
source exception :
filter VLANs : filter not specified
Feature Enabled Value Modules Supported Modules Not-Supported
-----------------------------------------------------------------------------
MTU-Trunc No
rate-limit-rx No
rate-limit-tx No
Sampling No
MCBE No
ERSPAN-ACL - - 1 4 7 8 5 10
ERSPAN-V2 Yes - 1 4 7 8 5 10
RB span No
Legend:
MCBE = Multicast Best Effort
L3-TX = L3 Multicast Egress SPAN
ExSP-X = Exception Span for type X (L3, FP, or misc)
Extensible Network Controller - XNC
To make Cisco switches Openflow capable, you need to install the "Cisco Plug-in for Openflow" to the Nexus switch. In my testing environment I have deployed the Cisco Plug-in for Openflow 1.1.1 .ova file on Nexus 5596 virtual service container. To understand how it is installed and activated, you can follow this guide:
http://www.cisco.com/c/en/us/td/docs/switches/datacenter/sdn/configuration/openflow-agent-nxos/cg-virtual-service-container.html
After installed and activated, you should see the Cisco Plugin for Openflow is running on your Nexus. You need at least NX-OS 7.0.1.N1.1 on N5K to support this plugin.
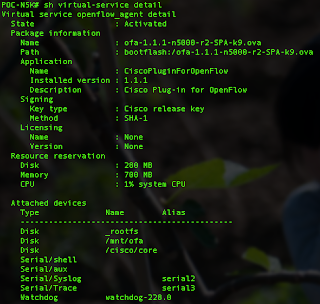
Then you can start with some basic Openflow configuration on your Nexus box. Detail configuration you can refer to the following guide:
http://www.cisco.com/c/en/us/td/docs/switches/datacenter/sdn/configuration/openflow-agent-nxos/cg-nxos-openflow.html#task_19259681156D48A9B43E37CE4CF650E6
This is my Openflow configuration. My XNC IP address is 10.1.90.51.
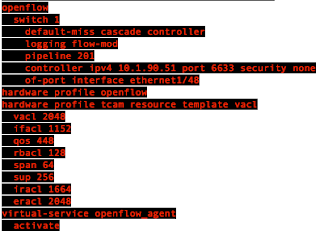
One caveat is the default tcp port for Nexus and XNC is 6653/tcp on NX-OS. If you don't specify the port in your configuration, it will default to 6653.tcp, which is WRONG! I have spent days to find that out. The correct port is 6633/tcp. Needs to be careful about that.
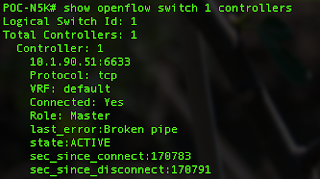
Then you will able to see the state "ACTIVE" once you connect the XNC controller.
For the XNC controller, I have downloaded the version 1.5 from CCO and you can use it once you unzip it in a Linux box. You need to make sure you have Java 1.7 or above before running it. To run it, simply run the "runxnc.sh" and the controller process will run in background.
You can see from below screen capture that my N5K is discovered by the XNC controller:
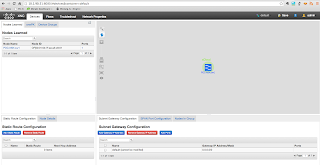
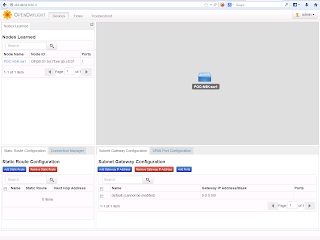
I have also installed OpenDaylight in my environment, in the same machine. Since both of them are listened to 8080/tcp for the web elements, I cannot turn them on at the same time. So I have stopped my XNC and run ODL and it is how it looks. Pretty similar to XNC but with less features.
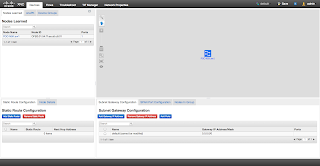
You can also add on module to XNC such as TIF manager. That is yet another zip file, once you unzip it, the .jar file will be placed in the plugin folder and it will show up on the web GUI once you restart the controller process.
Wednesday, December 11, 2013
OTV - Selective Unicast Flooding
otv flood mac 0011.2233.4455 vlan 66
RBAC - san-admin on Nexus 5500
10GBase-LRM SFP+ support on Nexus
Wednesday, February 15, 2012
Comparing N5K and N7K - a very high level key features comparison
- A-FEX
- VM-FEX
- FC
- Unified Ports
- EvPC
7K
- OTV
- LISP
- MPLS
- VDC
Both of them support FabricPath (N7K F1 and F2 cards), vPC, L3, FEX, etc
ASR 1000 OTV supports on IOS XE 3.5
- Support OTV with GETVPN on ASR1K
- No Adjacency server support, multicast WAN is required
- Support fragmentation
- Support of one Joint interface and one access interface per box
Nexus 7000 - M1 modules and F2 modules quick comparison
| M1 | F2 |
| Max 8 x 10GE line rate ports | Max 48 1/10GE line rate ports |
| Full L2 and L3 feature | Full L2 and L3 feature |
| Large FIB, ACL, QoS Tables | Small FIB, ACL, QoS Tables |
| MPLS | MPLS NOT supported |
| LISP | LISP NOT supported |
| FEX Support | FEX Support |
| FabricPath NOT Supported | FabricPath |
| FCoE NOT supported | FCoE (will support in future release) |
Saturday, January 1, 2011
Nexus 1000v Setup and Configuration
My environment: Nexus1000v.4.0.4.SV1.3b, VMWare ESXi 4.1, vCenter 4.1
Nexus 1000v consists of VSM (control plane) and VEM (data plane). VSM can run as a VM or in a standalone appliance. In my setup I run it as a VM on one of my ESXi hosts. The Nexus1000v software comes with both VSM and VEM within a zip file.
1. To install the VSM, locate the .ova file in the VSM folder. In your vSphere client, click File > “Deploy OVF template”
2. During the deployment, you need to provide the following information:
- Control VLAN ID
- Packet VLAN ID
- Domain ID
- Management IP address
3. You can use the same vlan for control, packet and management, and do not place data traffic on this VLAN. The wizard is quite straight forward so the details will not be covered here.
4. Next step is to create Nexus 1000v plug-in. Browse the page http://vsm-ip-address and download the cisco_nexus1000v_extension.xml file
5. In vSphere Client, Plug-Ins menu, choose “Manage Plug-Ins”. Click “Register Plug-In” and import the XML file downloaded from the VSM page.
6. Then connect your VSM to the vCenter
conf t
svs connection VC
protocol vmware-vim
remote ip address 1.2.3.4
vmware dvs datacenter-name panda-DC
connect
7. Then you can create system port-profile and data port-profile.
port-profile type ethernet system-uplink
vmware port-group
switchport mode trunk
switchport trunk allowed vlan all
no shutdown
system vlan 2010
state enabled
port-profile type vethernet cciev-server
vmware port-group
switchport mode access
switchport access vlan 100
no shutdown
state enabled
8. Next step is to install VEM, the easiest way is to do it via VMWare Update Manager. In vSphere client > Update Manager > Patch Repository, click “Import Patch”, then choose the VEM module in the Nexus 1000v VEM folder.
9. Then create a new baseline. Under Baseline and Groups, click create baselines. Choose VEM under extensions.
10. You can now apply the baseline to the host. In vSphere Client > Hosts and Clusters, choose the host you want to install VEM. Click the Update Manager tab which is usually the last tab. Click “Attach” to attach the baseline you’ve just created, then click Remediate to apply.
11. Now the final step is to add the host to the Nexus 1000v switch. Under Inventory > Networking, choose the Nexus 1000v switch and right click, click “Add host”. Apply the system port-profile to the vmnic and apply appropriate data port profile to the VMs.
12. After adding, you can type the command “show interface virtual” and “show module” on VSM to verify your work.
Sunday, October 10, 2010
Nexus 5000 - SFP validation failed on 1G port
My environment: Nexus 5010 with NX-OS 4.2(1)N2(1)
Nexus 5000 supports 1G connection starting from 4.0(1a)N1(1). I have tried to plug in the GE SFP to N5K and it shows the "SFP validation failed" message" in the "show interface" output. The trick is:
1. Unplug your GE SFP
2. go to your interface configuration, and type "speed 1000". You CAN'T change the port speed after you plug in your SFP.
3. Plug in your GE SFP again. And it works!
More information:
http://www.cisco.com/en/US/partner/docs/switches/datacenter/nexus5000/sw/command/reference/rel_4_1/ethernet-cmd-ref.html#wp1619365
"If the interface and transceiver speed is mismatched, the SFP validation failed message is displayed when you enter the show interface ethernet slot/port command. For example, if you insert a 1-Gigabit SFP transceiver into a port without configuring the speed 1000 command, you will get this error. By default, all ports on a Cisco Nexus 5000 Series switch are 10 Gigabits. "
Monday, April 12, 2010
Learning Nexus 7000 QoS by Example
My environment: Nexus 7010, NX-OS 4.2
Just got a chance to play with the Nexus 7000 NX-OS QoS, the “mls qos” syntax has gone and now all the commands are based on MQC.
In the following example, I’m going to configure 2 ingress ports, one with high priority traffic and one with normal traffic, and at egress port high priority traffic will be assigned to PQ to dequeue first.
Classification
N7K# conf t
class-map type queuing match-any 1p3q4t-out-pq1
match cos 5
It can only be done via the main VDC. It can’t be done on child VDC. And you can ONLY match cos in the class-map.
Marking
Now let’s mark the ingress traffic, I will do this at the port assigned to the vdc “test”.
N7K# switchto vdc test
N7K-test#
policy-map type queuing highpriority-in-policy
class type queuing 2q4t-in-q-default
set cos 5
Scheduling and Queuing
Finally, I want to assign the high priority traffic (cos=5) to PQ
N7K-test#
policy-map type queuing highpriority-out-policy
class type queuing 1p3q4t-out-pq1
priority level 1
Last step is to assign service policy to the interface:
N7K-test#
int e3/1
description - High Priority – Ingress -
service-policy type queuing input highpriority-in-policy
!
int e3/2
description – Low Priority – Ingress -
!
int e3/3
description – Egress Port -
service-policy type queuing output highpriority-out-policy
!
Saturday, April 19, 2008
Nexus: Hands on with NX-OS, Part#1
http://www.networkworld.com/community/node/26877
Some notable difference between NX-OS and IOS are some of the L3 features like OSPF, HSRP, etc.
Friday, March 21, 2008
Thursday, February 7, 2008
New Monster Switch - Cisco Nexus 7000

Some key points for N7K:
- Data Center Class Switching Platform
- Today 1.4Tbps, Scales beyond 15Tbps
- New OS - NX-OS, a combination of IOS and SAN-OS
- Cisco Trusted Sec enabled - link layer encryption at line rate and RBAC
- Virtualization - Virtual Device Contexts
- Future FCoE support
- Unified I/O - save CapEx and OpEx - less HBA cards
Interesting Facts with N7K:
- Download entire Wikipedia in 10ms
- Download and transfer the entire searchable Internet in 7.5 mins
- Send a photo to every single person on earth in 1/2 hr.
- Transfer 5 mil concurrent Telepresence sessions


