Just wanna share a trick that some of you might know already. Quite useful if you want to quickly view the file content in UCM TFTP server using your browser.
Say for example if you want to view your jabber-config.xml in the UCM TFTP root directory, you can use your browser to access the link:
http://ucm_ip_address:6970/jabber-config.xml

Saturday, April 26, 2014
Cisco Telepresence - sending DTMF using API and cURL
Very similar to my previous post:
http://pandaeatsbamboo.blogspot.hk/2014/04/making-cisco-telepresence-calls-using.html
We can send DTMF using CURL + TC firmware API. This is useful when you want to join a multipoint video call which has password protected, and you want to automate that.
You can use the same curl command in my previous post, and for the xml file content, this is the sample to use while you are in call:
<Command><DTMFSend command="True"><DTMFString>000000#</DTMFString></DTMFSend></Command>
Friday, April 25, 2014
Smart Call Team - A Cisco OnePK + Collaboration Demo
This is a demonstration to quickly demo what a OnePK application could do. The java application is based on the tutorial application in the all-in-one VM downloaded from the Cisco DevNet.
The OnePK java application will monitor the OnePK enabled router interface status. When a link down event is detected, it will trigger an API call to call all the experts to deal with this emergency situation, and the experts can receive this call with any endpoints, including Jabber on mobile.
These are the equipments used for this demonstration:
- OnePK All in One VM, with Java application loaded
- One IOS router with OnePK enabled
- Jabber on iPhone
- SX20
- EX90
- CMR (video infrastructure, including virtual TPS)
Thursday, April 24, 2014
Making Cisco Telepresence calls using API and cURL
For those EX, SX, MX and C-series codec which are running TC firmware, you can use the below method to make and disconnect call with CURL using its XML API. In my lab environment I am using TC7.1, however earlier release will also work. My video endpoint IP address is 192.168.24.6 and going to make a phone call to number 8334.
Make call
[root@ns3 ~]# curl -k -u admin:panda123 -H "Content-type: text/xml;" -d @ex.xml http://192.168.24.6/formputxml?xmldoc
Output:
<Command><DialResult status="OK" item="1">
<CallId item="1">7</CallId>
<ConferenceId item="1">6</ConferenceId>
</DialResult>
</Command>
<Command><DialResult status="OK" item="1">
<CallId item="1">7</CallId>
<ConferenceId item="1">6</ConferenceId>
</DialResult>
</Command>
ex.xml file content:
<Command><Dial command="True"><Number>8334</Number><Protocol>h323</Protocol></Dial></Command>
Disconnect All calls
[root@ns3 ~]# curl -k -u admin:panda123 -H "Content-type: text/xml;" -d @ex2.xml http://192.168.24.6/formputxml?xmldoc
Output:
<Command><DisconnectAllResult status="OK" item="1"/>
ex2.xml file content:
<Command><Call command="True"><DisconnectAll></DisconnectAll></Call></Command>
Cisco vNAM and ERSPAN config on N7K
NAM is a tool which helps you to collect network information via SPAN, ERSPAN and Netflow. There is a virtual version vNAM which allows you to install it on VM. I have a setup in my NAM using vNAM 6.0(2). This is particular useful after 1040 Sensor announced EoS, and it can provide data to Prime Collaboration Assurance for better reporting capability on voice service quality. I have a Nexus 7000 in my lab, ERSPAN is configured to send traffic to send my vNAM. This is my ERSPAN configuration on 7K and related show command.
monitor erspan origin ip-address 10.1.90.254 global

monitor session 10 type erspan-source
erspan-id 90
vrf default
destination ip 10.1.90.71
source vlan 90-91,93 both
no shut
erspan-id 90
vrf default
destination ip 10.1.90.71
source vlan 90-91,93 both
no shut
N7K# sh monitor session 10
session 10
---------------
type : erspan-source
state : up
erspan-id : 90
vrf-name : default
acl-name : acl-name not specified
ip-ttl : 255
ip-dscp : 0
destination-ip : 10.1.90.71
origin-ip : 10.1.90.254 (global)
source intf :
rx :
tx :
both :
source VLANs :
rx : 90-91,93
tx : 90-91,93
both : 90-91,93
source exception :
filter VLANs : filter not specified
Feature Enabled Value Modules Supported Modules Not-Supported
-----------------------------------------------------------------------------
MTU-Trunc No
rate-limit-rx No
rate-limit-tx No
Sampling No
MCBE No
ERSPAN-ACL - - 1 4 7 8 5 10
ERSPAN-V2 Yes - 1 4 7 8 5 10
RB span No
Legend:
MCBE = Multicast Best Effort
L3-TX = L3 Multicast Egress SPAN
ExSP-X = Exception Span for type X (L3, FP, or misc)


Extensible Network Controller - XNC
XNC is Cisco distribution of OpenDayLight, with some features add on like network slicing, topology independent forwarding etc. The original OpenDayLight will talk to the network element using Openflow as the southbound API. For XNC, OnePK support is added and you can use it as a southbound protocol to talk to the network elements. This blog post will give you a preliminary overview on how it works and how to add a "REAL" device to XNC / OpenDaylight. On Internet right now there are a lot of tutorial on how OpenDayLight works with Mininet, but not much about how OpenDayLight / XNC works with a "REAL" network device that's why I want to give it a try and test it out.
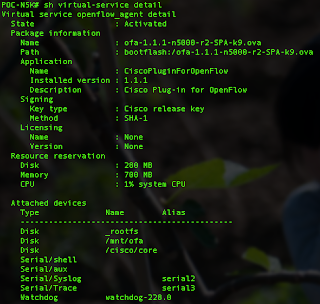
To make Cisco switches Openflow capable, you need to install the "Cisco Plug-in for Openflow" to the Nexus switch. In my testing environment I have deployed the Cisco Plug-in for Openflow 1.1.1 .ova file on Nexus 5596 virtual service container. To understand how it is installed and activated, you can follow this guide:
http://www.cisco.com/c/en/us/td/docs/switches/datacenter/sdn/configuration/openflow-agent-nxos/cg-virtual-service-container.html
After installed and activated, you should see the Cisco Plugin for Openflow is running on your Nexus. You need at least NX-OS 7.0.1.N1.1 on N5K to support this plugin.
Then you can start with some basic Openflow configuration on your Nexus box. Detail configuration you can refer to the following guide:
http://www.cisco.com/c/en/us/td/docs/switches/datacenter/sdn/configuration/openflow-agent-nxos/cg-nxos-openflow.html#task_19259681156D48A9B43E37CE4CF650E6
This is my Openflow configuration. My XNC IP address is 10.1.90.51.

One caveat is the default tcp port for Nexus and XNC is 6653/tcp on NX-OS. If you don't specify the port in your configuration, it will default to 6653.tcp, which is WRONG! I have spent days to find that out. The correct port is 6633/tcp. Needs to be careful about that.
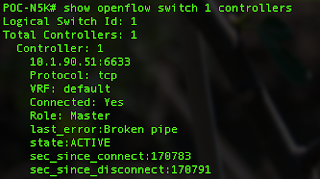
Then you will able to see the state "ACTIVE" once you connect the XNC controller.
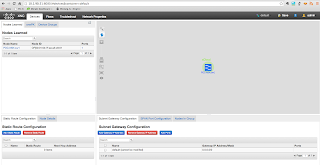
For the XNC controller, I have downloaded the version 1.5 from CCO and you can use it once you unzip it in a Linux box. You need to make sure you have Java 1.7 or above before running it. To run it, simply run the "runxnc.sh" and the controller process will run in background.
You can see from below screen capture that my N5K is discovered by the XNC controller:
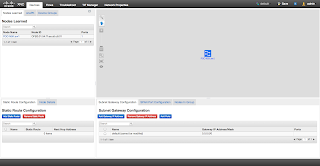
I have also installed OpenDaylight in my environment, in the same machine. Since both of them are listened to 8080/tcp for the web elements, I cannot turn them on at the same time. So I have stopped my XNC and run ODL and it is how it looks. Pretty similar to XNC but with less features.

You can also add on module to XNC such as TIF manager. That is yet another zip file, once you unzip it, the .jar file will be placed in the plugin folder and it will show up on the web GUI once you restart the controller process.
To make Cisco switches Openflow capable, you need to install the "Cisco Plug-in for Openflow" to the Nexus switch. In my testing environment I have deployed the Cisco Plug-in for Openflow 1.1.1 .ova file on Nexus 5596 virtual service container. To understand how it is installed and activated, you can follow this guide:
http://www.cisco.com/c/en/us/td/docs/switches/datacenter/sdn/configuration/openflow-agent-nxos/cg-virtual-service-container.html
After installed and activated, you should see the Cisco Plugin for Openflow is running on your Nexus. You need at least NX-OS 7.0.1.N1.1 on N5K to support this plugin.

Then you can start with some basic Openflow configuration on your Nexus box. Detail configuration you can refer to the following guide:
http://www.cisco.com/c/en/us/td/docs/switches/datacenter/sdn/configuration/openflow-agent-nxos/cg-nxos-openflow.html#task_19259681156D48A9B43E37CE4CF650E6
This is my Openflow configuration. My XNC IP address is 10.1.90.51.

One caveat is the default tcp port for Nexus and XNC is 6653/tcp on NX-OS. If you don't specify the port in your configuration, it will default to 6653.tcp, which is WRONG! I have spent days to find that out. The correct port is 6633/tcp. Needs to be careful about that.

Then you will able to see the state "ACTIVE" once you connect the XNC controller.
For the XNC controller, I have downloaded the version 1.5 from CCO and you can use it once you unzip it in a Linux box. You need to make sure you have Java 1.7 or above before running it. To run it, simply run the "runxnc.sh" and the controller process will run in background.
You can see from below screen capture that my N5K is discovered by the XNC controller:

I have also installed OpenDaylight in my environment, in the same machine. Since both of them are listened to 8080/tcp for the web elements, I cannot turn them on at the same time. So I have stopped my XNC and run ODL and it is how it looks. Pretty similar to XNC but with less features.

You can also add on module to XNC such as TIF manager. That is yet another zip file, once you unzip it, the .jar file will be placed in the plugin folder and it will show up on the web GUI once you restart the controller process.

UCM 10.0 - Video on Hold
Video on hold is a new feature available in UCM 10.0, working together with MediaSense. In my lab I have my UCM 10.0 and MediaSense 10.0 integrated, and in this blog post I will not go through how we integrate them as it is a quite straightforward. I will focus on how to get the Video on Hold to work.
1. On UCM, check out the new "Video On Hold Server" option under "Media Resources"

2. Add a new VoH server. The Default Video Content Identifier is the video SIP URI configured on MediaSense. You can make a call to, say in my case, ciscovideo@10.1.90.61 and view the video streaming. The configuration on the MediaSense side will be done later. Unlike audio MoH which you can choose the audio music source, in UCM 10.0 I can't find a place that you can play different video files by different endpoints, which means all the phones need to play the same video file for their VoH. If anyone find it is not true, feel free to let me know.

3. Create a Media resource group to contain this VoH, and add this MRG to your MRGL. Try to move this VoH above your MoH MRG in your MRGL.
4. On the MediaSense side, you need to upload the move to the MediaSense server. You need to make sure your video file is H.264 with audio track, and what I have done is I will convert my video source file first before upload to the MediaSense server. This is the convertor I used on my Mac. I used the iPhone 4 profile to do the conversion.

5. Go to MediaSense > Media File Management, upload your file to the MediaSense server. The file resolution will be converted to either 640x480 or 640x360.

6. Then the final step is the most important. In the Incoming Call Configuration, add an try reference to your video file. This is the URI that is exposed to outside world so that the UCM can use it as the video on hold source. It is the name you use in your UCM Video on Hold server "Default Video Content Identifier" field.

Done! To see how it works you can checkout my youtube demo video:
Subscribe to:
Posts (Atom)